
How to Use Survey Templates
Launching your first survey should feel straightforward, not overwhelming. Treat it as a practice run: confirm participants can respond easily, and get familiar with how results are displayed.
Here are 7 easy steps to using survey templates like a pro:
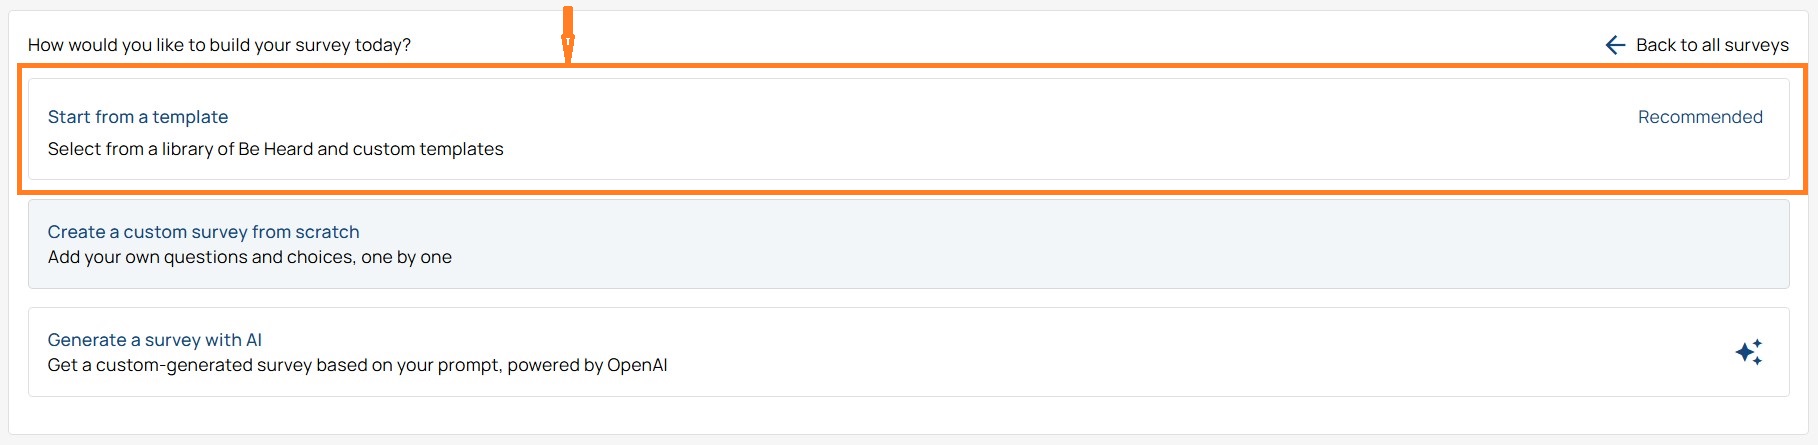
Step 1. Choose a Survey Template
Find Templates
- Open the left side menu, then click Survey Templates.
OR - Navigate to + New Survey in the top right corner of the main content area. Choose Start from a template.
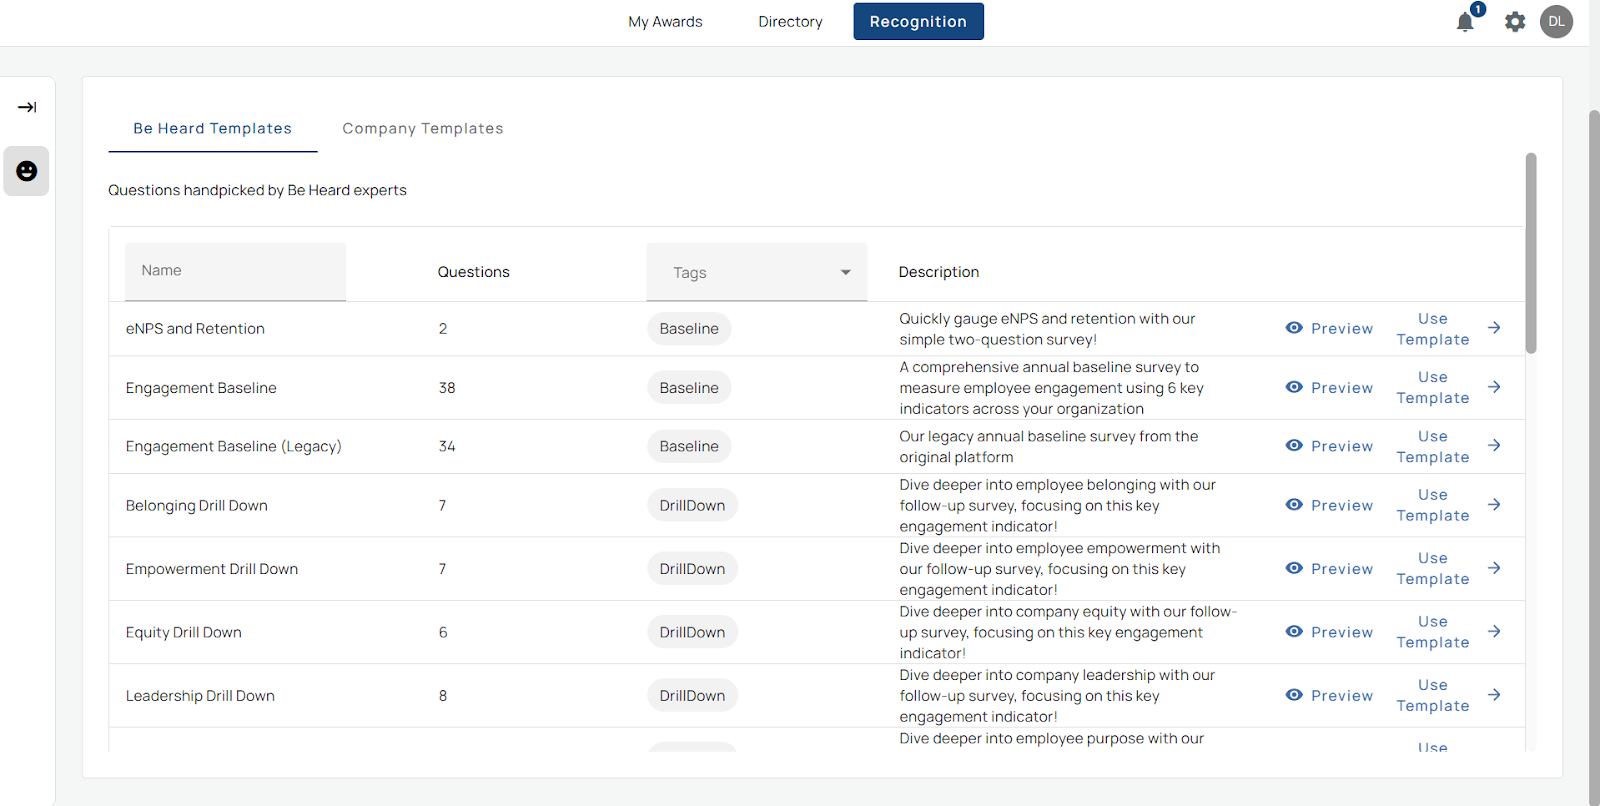
Templates Page
- Choose between Be Heard Templates.
- Each template shows:
- Name
- Number of Questions
- Tags (e.g., DrillDown, Baseline)
- Description of the survey focus.
- Actions: Preview or Use Template.
Template Preview
- Click Preview to see how the survey looks.
- Toggle view across Desktop, Tablet, and Mobile.
- Confirm question layout, scales, and instructions.
If satisfied, click Use Template to proceed.
Naming the Survey
- A prompt appears asking you to confirm or rename the survey (default is the template name).
- Enter the survey name and click Continue.
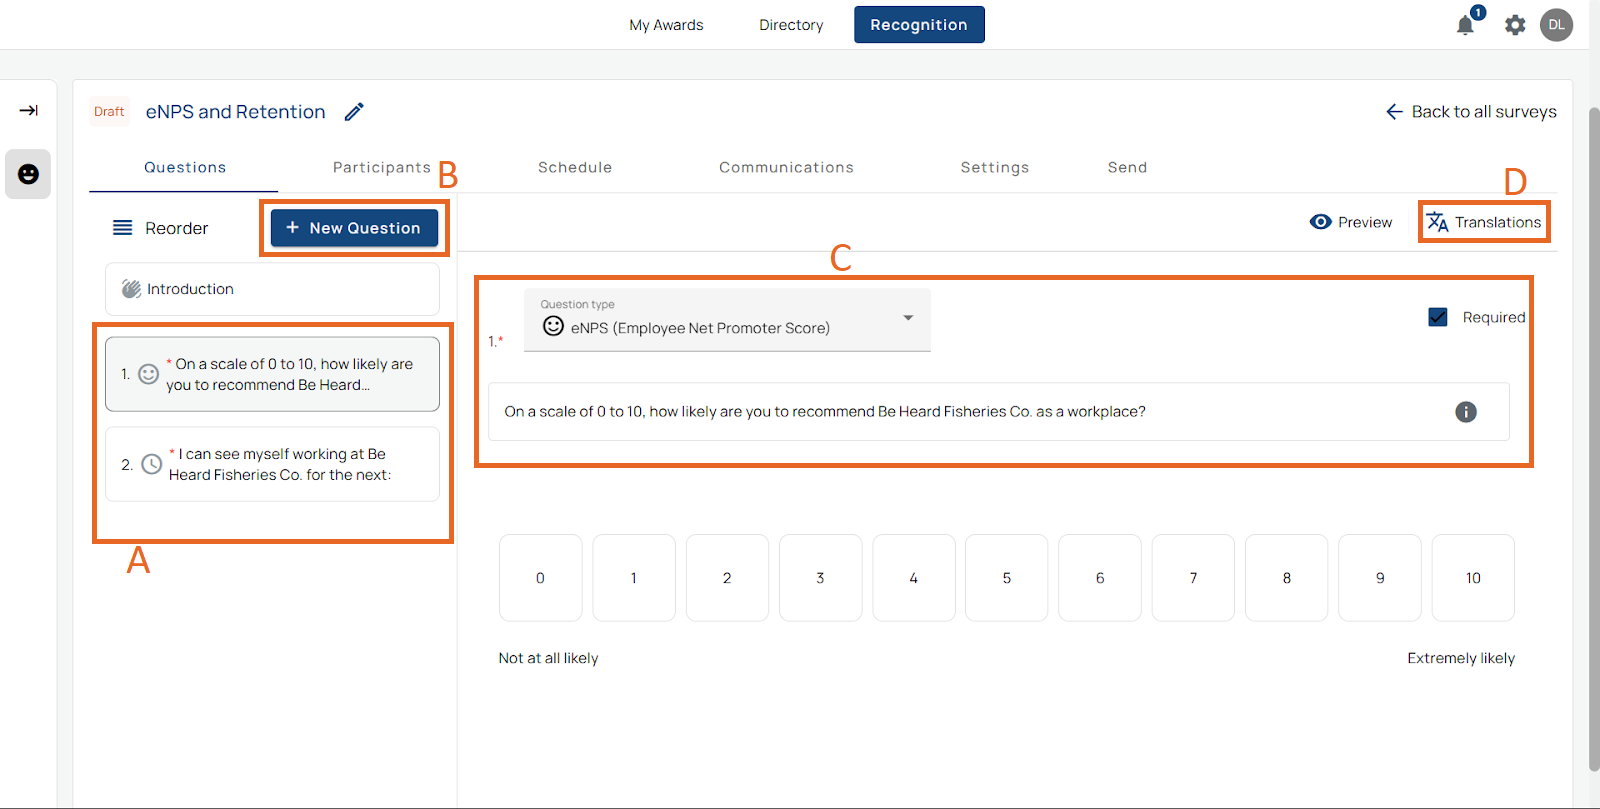
Step 2. Question Builder
- Reorder or add new questions (Left Panel): Once you’ve chosen a template (like eNPS and Retention), your survey will already include a set of questions. These can be reordered, edited, or expanded.
- Add new questions by clicking + New Question. Select a type (e.g., single choice, multi-select, scale) and enter your options.
- Main Area: Edit question text, select question type (e.g., scale, multiple choice), and make required at your discretion.
- Translations: Use the translations button if needed.
Note: all edits are autosaved.
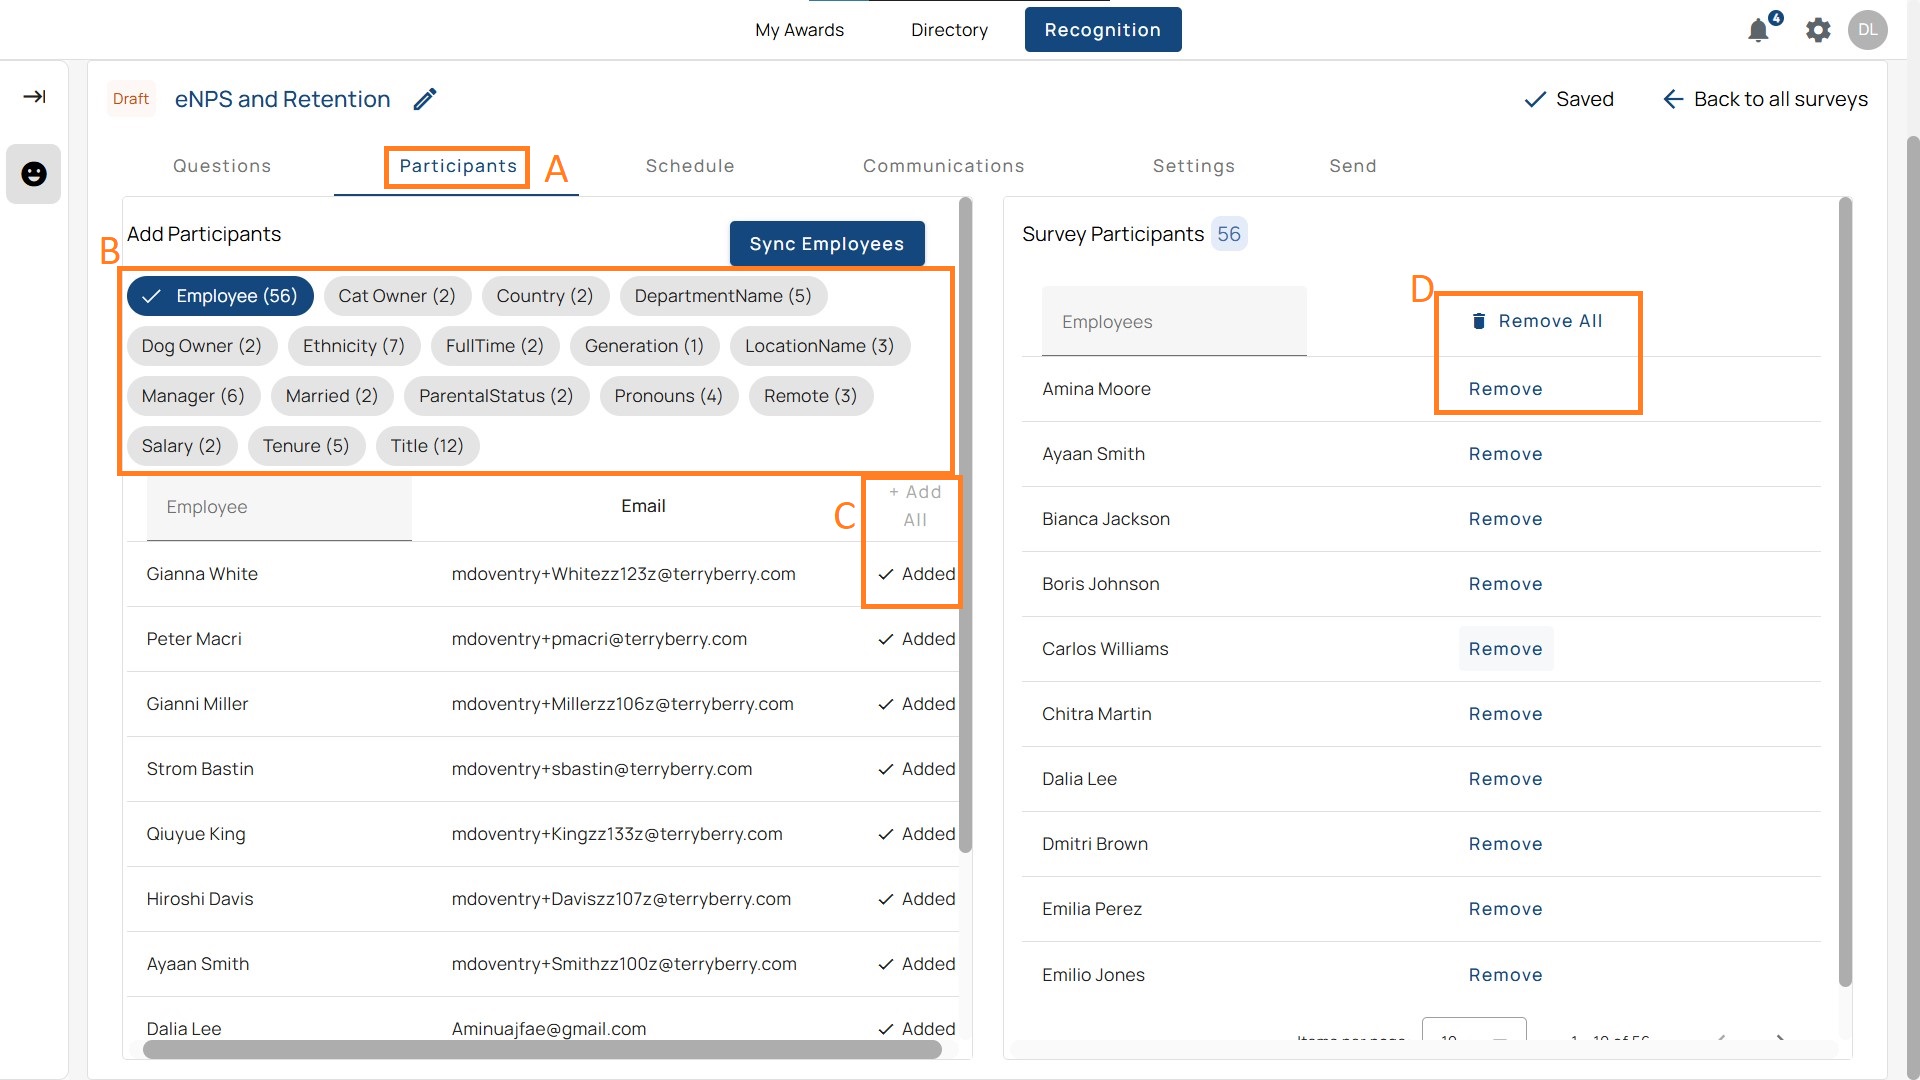
Step 3. Add Participants
- Go to the Participants tab.
- Use filters (e.g., tenure, department, gender) to target groups.
- Select employees individually, by group (filers), or Add All. The selected employee(s) will appear in the panel on the right, where you can also remove individuals.
- Remove participants with Remove or clear all with Remove All.
Note: You can also add employees manually by name or sync your list from an HRIS integration.
Step 4. Schedule Survey
- Go to the Schedule tab to decide when the survey will be sent out.
- Specific Date and Time: Choose start and end dates.
- Automatic by Event: Trigger surveys based on individual events (e.g. 7 days after hire). This option is often used for New Hire or Exit surveys.
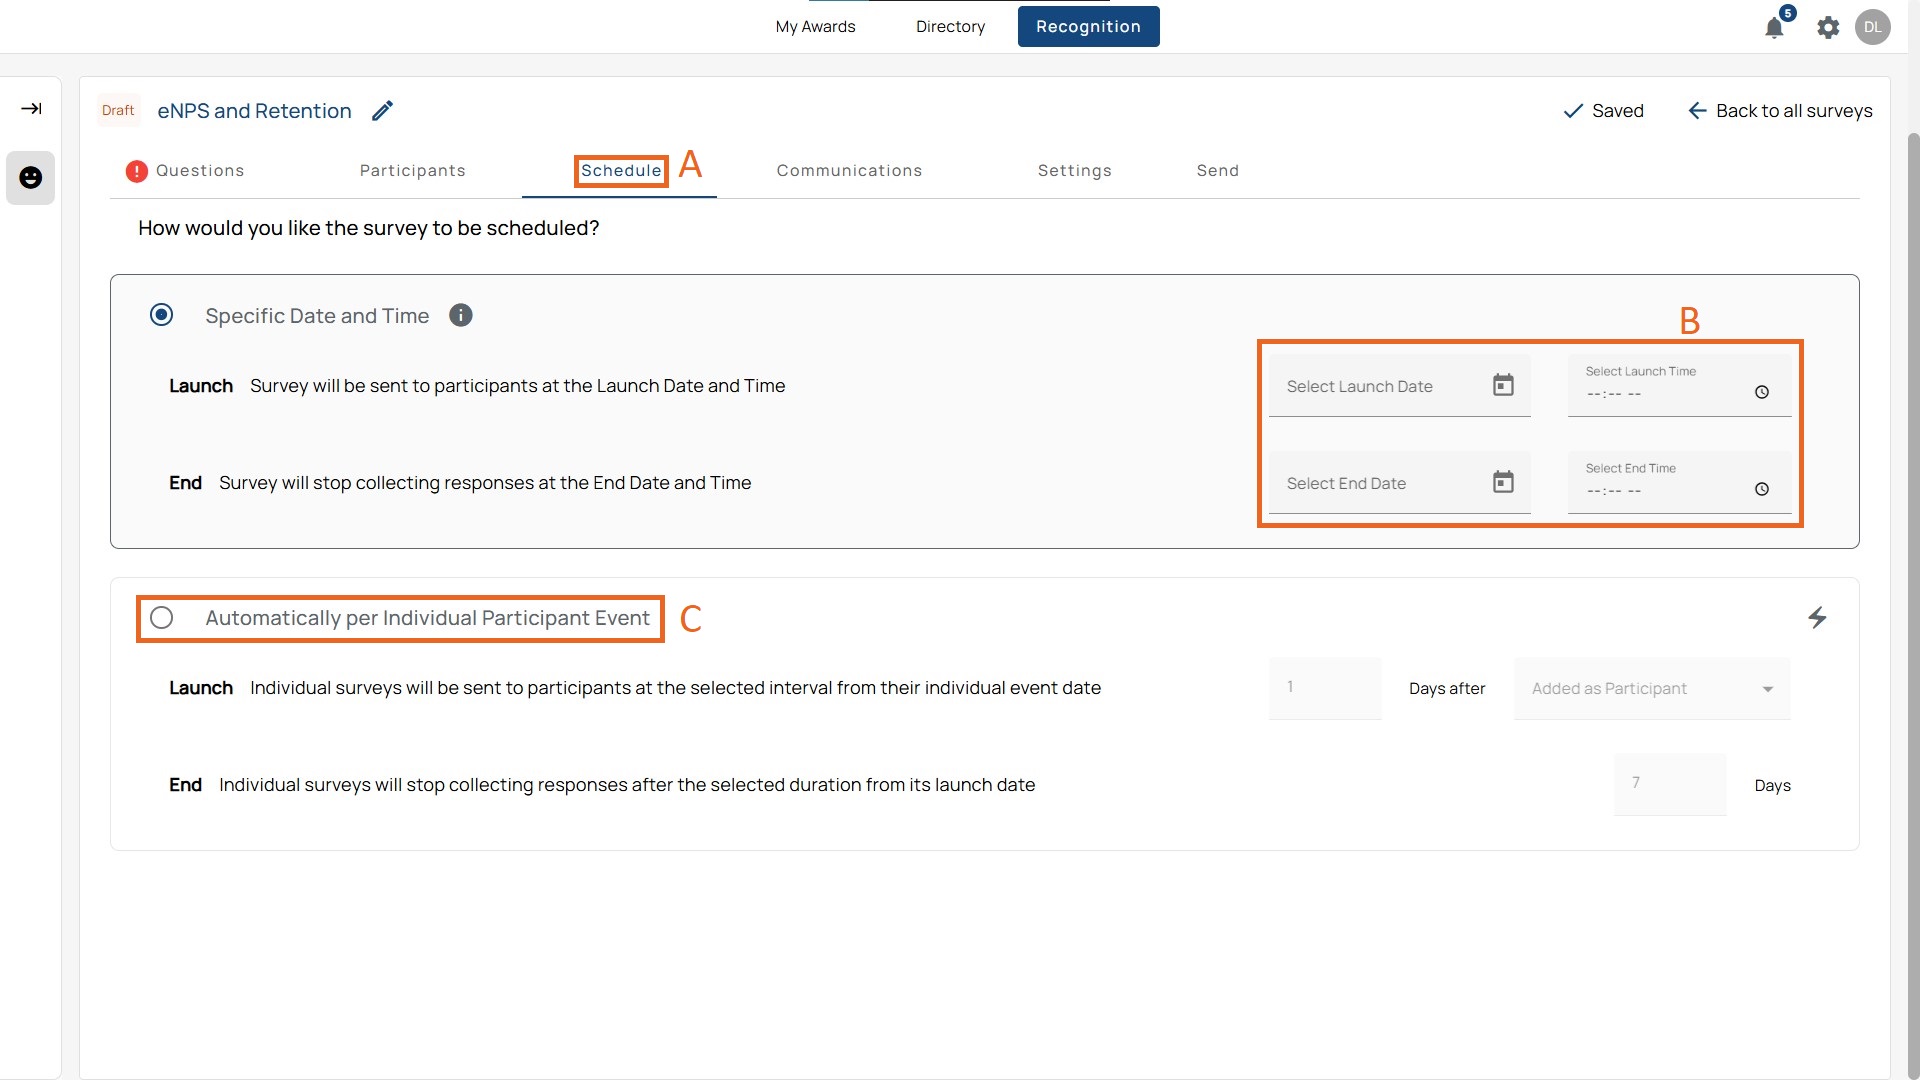
Tip: The platform auto-generates reminders based on your schedule, so make sure your timeline allows enough time for reminders and responses.
Step 5. Configure Communications
- Open the Communications tab.

- Review default launch and reminder messages. The number and spacing of reminders adjust based on your survey timeline.
- You can customize subject lines and message text by clicking Customize Communications. The system keeps standardized openings and closings intact, but the body of the message is editable.
- If needed, adjust reminder timings or reset to default.
Step 6. Adjust Settings
Click the Settings tab.
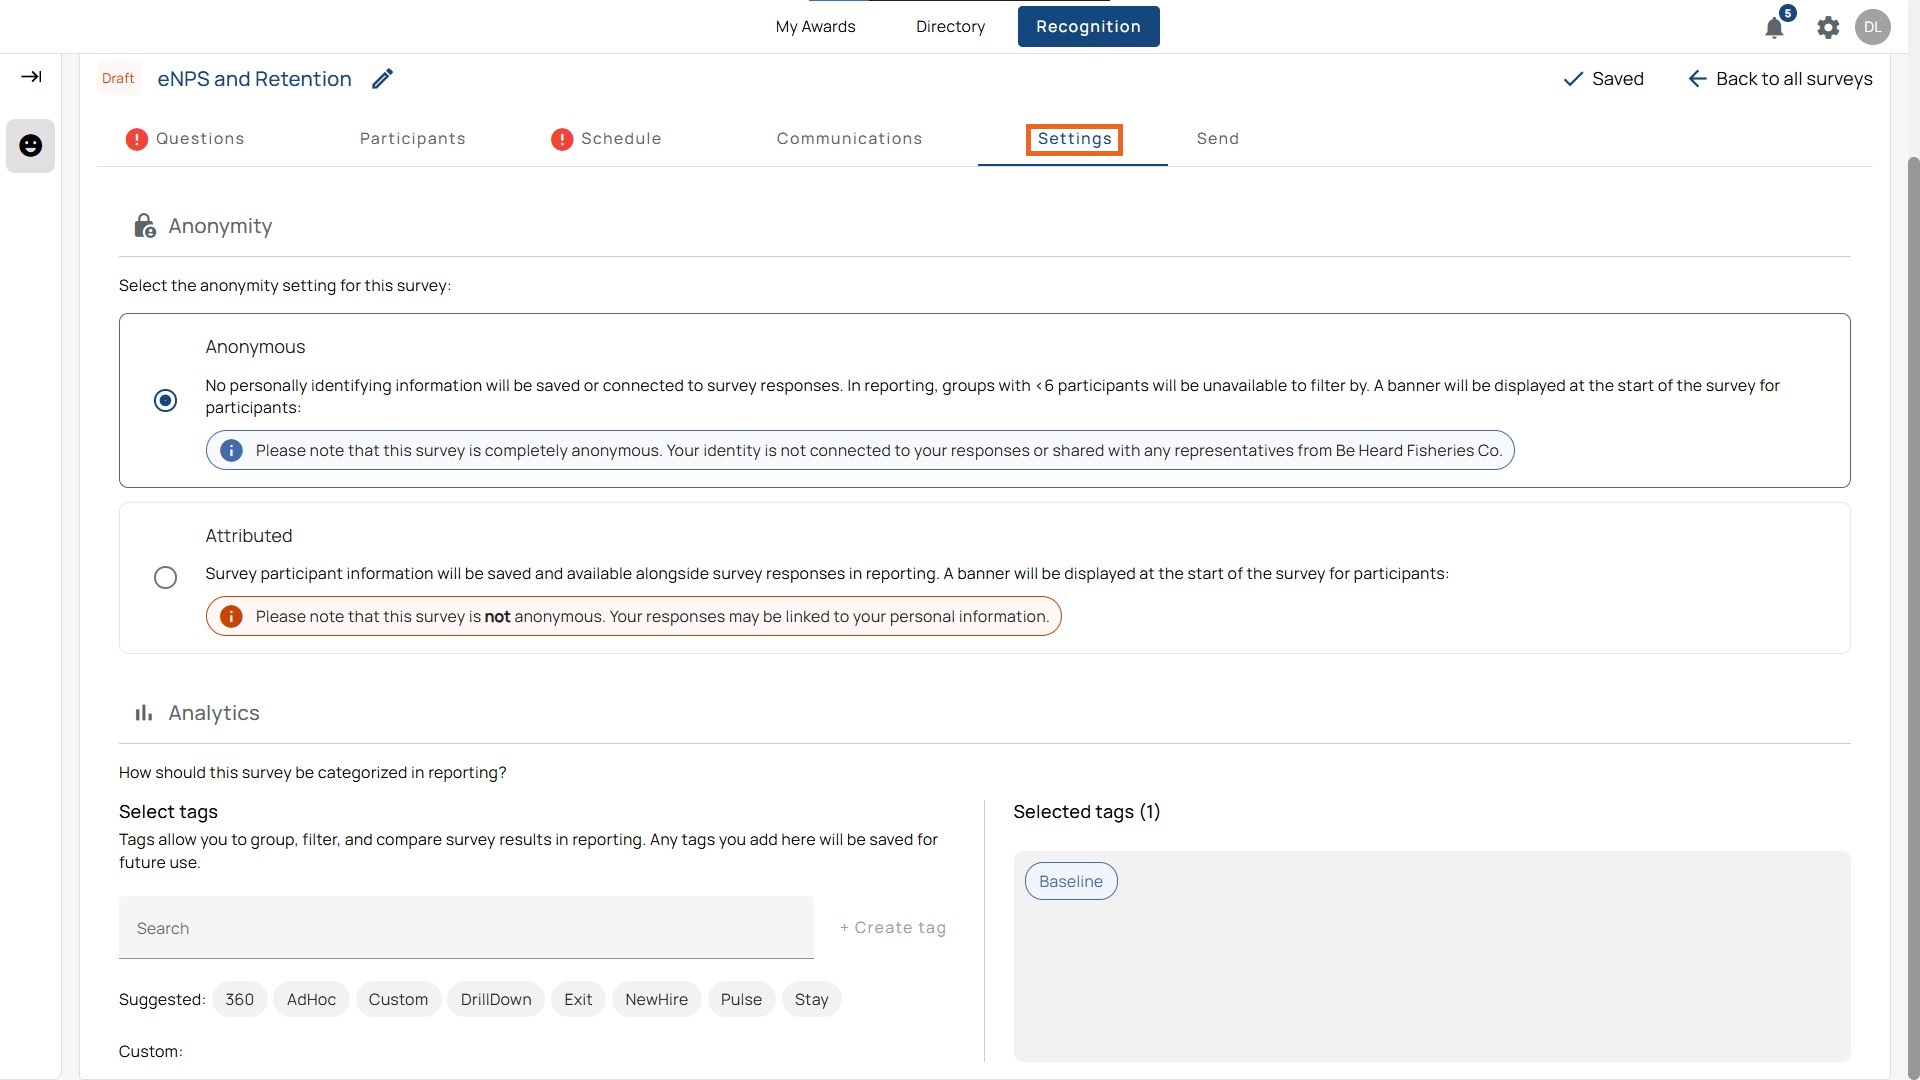
- Anonymous
- No personally identifying information is stored or connected to responses.
- Reports cannot display groups smaller than the minimum threshold (default: 6 participants).
- A banner at the start of the survey confirms anonymity for participants.
- Attributed
- Participant information is saved and linked with responses.
- Reports can show individual-level data.
- A banner at the start of the survey alerts participants that responses are not anonymous.
- Auto-Scheduling Per Event: To have a survey automatically launch for events (e.g., onboarding, exit), select Attributed in the Settings tab. This setting is required for event-based automation.
- Analytics
- Surveys can be categorized by applying tags that group them for reporting.
- Common tags include:
- Baseline – First or foundational survey, used for comparison over time.
- Pulse – Short, frequent surveys to measure changes quickly.
- eNPS – Focused on employee Net Promoter Score.
- DrillDown – Targeted surveys exploring specific topics (e.g., Leadership, Equity, Empowerment).
- Custom – Organization-defined tags for unique needs.
- Selected tags appear in the right-hand panel under “Selected Tags.”
Step 7. Finalize and Send
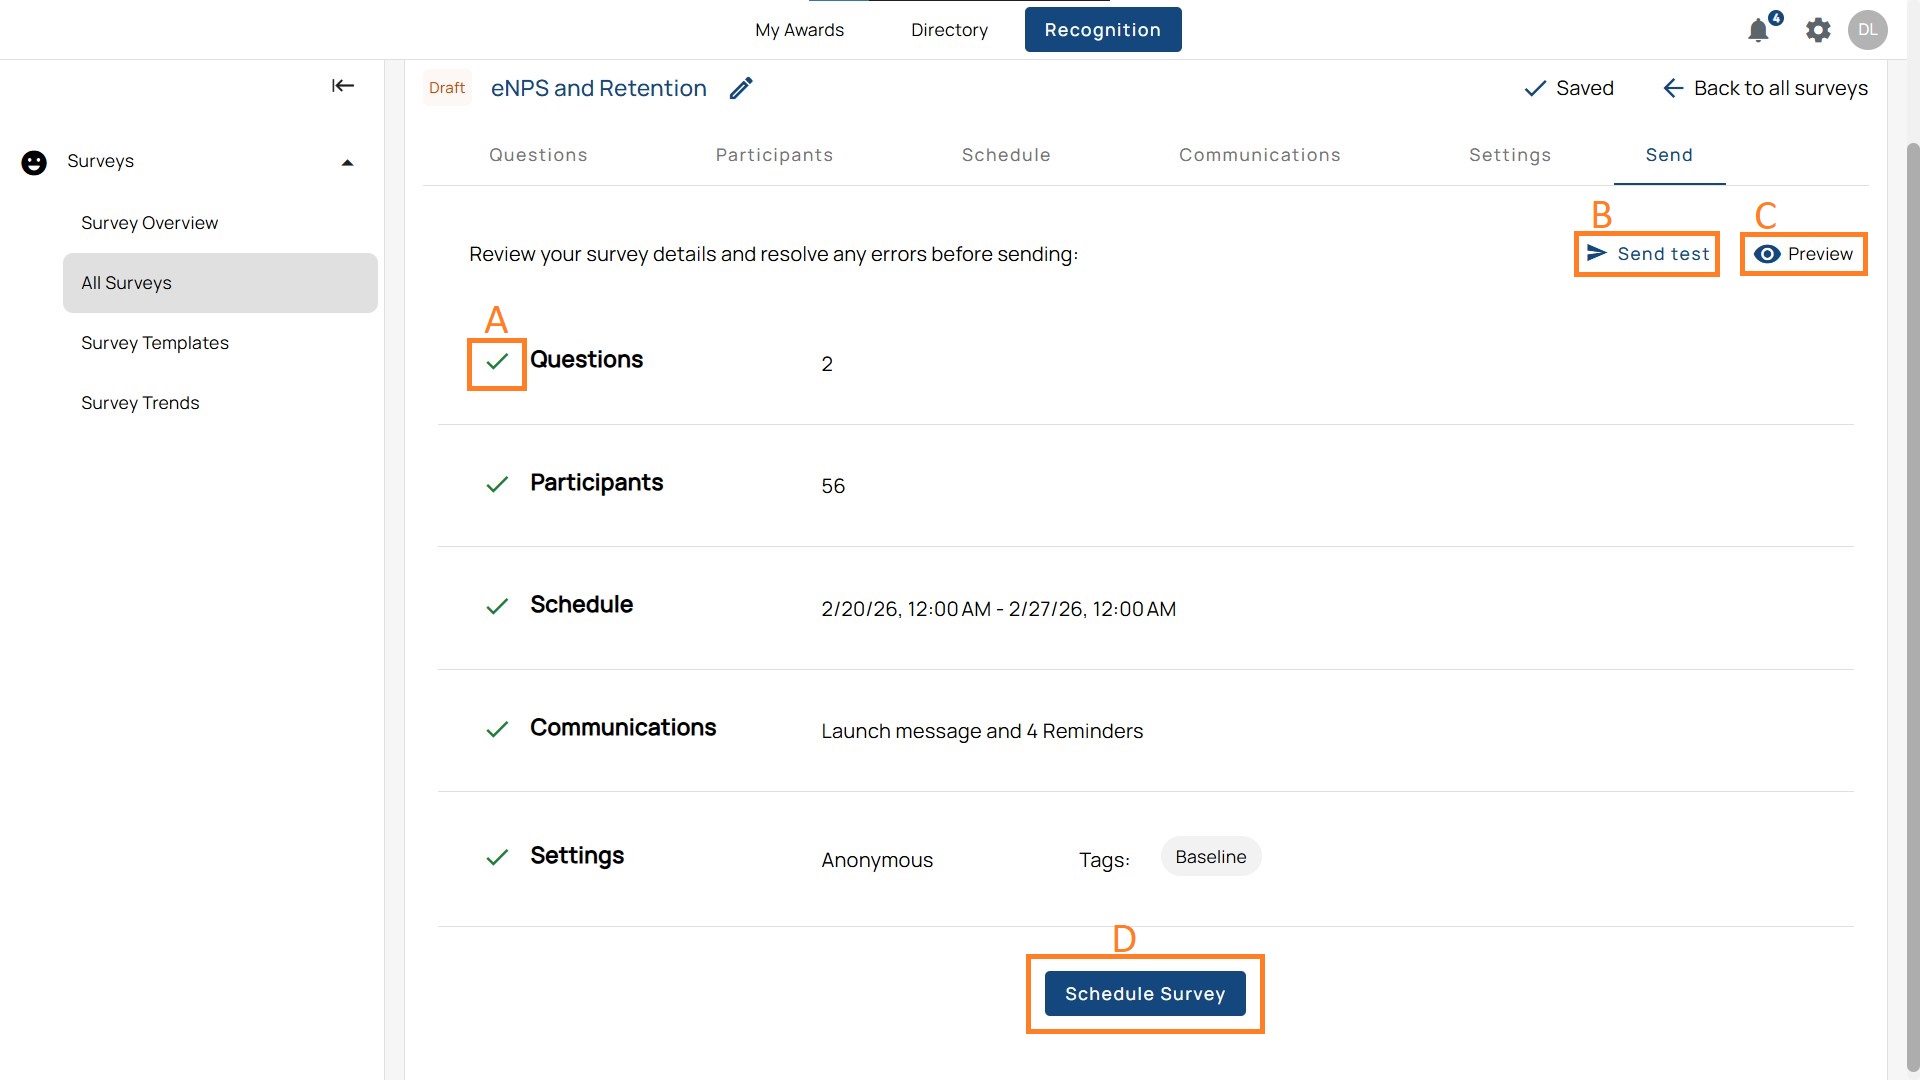
A. Error Check
- Go to the Send tab. This tab summarizes everything you’ve set up. It displays your choices across the five previous tabs: number of questions, participants, schedule, communications, settings, and tags.
- Red exclamation marks on tabs (e.g., Participants, Schedule) indicate incomplete setup. Once each section is completely filled, the indicator changes to a green check sign.
- Fix errors flagged with a red exclamation mark.
B. Send a Test Survey
- Click Send Test Survey to open the modal.
- Adding Users:
- Click Add Users to bring up your organization’s user list.
- Use the search bar to quickly select specific users.
- Test Restrictions:
- Test surveys are not live and will not collect participant data.
- They can only be sent to users within your organization (no external test recipients).
C. Preview
- Use Preview to see the survey across devices (web, tablet, mobile).
D. Schedule Survey
- Once ready, click Schedule Survey. The survey will move from draft to scheduled, and you can still unschedule it before launch if needed.